How to process large CSV file with Spring Batch

Overview
Spring has a long list of different projects to help Software Engineers achieve day-to-day business solutions, from configurations, to security, from batch processing of large files to messaging solutions, whatever problems you need to solve, there is always a module of spring that helps you achieve this.
Spring Batch, like all other projects is a lightweight yet comprehensive batch framework that is specifically designed to help engineers develop robust batch software applications essential for the daily operations of enterprise systems.

With Spring Batch, you are guaranteed to be provided with reusable functions that are essential in processing large volumes of records, which include but not limited to: logging/tracing, transaction management, job processing statistics, job restart, skip, and resource management.
Spring Batch Architecture
In Spring Batch, there are 3 simple operations that could be performed on data, this include: reading the file, performing some sort of transformation or processing on the data read and also writing the data back into another file or database.
ItemReader
This Interface let you read from Flat files, XML files and Databases, depending on the source of your data. In our case, we are calling FlatFileItemReader because we are reading data from a flat file.
Below is how the ItemReader Interface is defined.
public interface ItemReader <T> {

    T read() throws Exception, UnexpectedInputException, ParseException, NonTransientResourceException;

}
ItemProcessor
ItemProcessor helps to process the read data from the file and then sends the processed information out to be written by ItemWriter.
@Bean
public ItemProcessor<ReadUser, WriteUser> csvUserProcessor() {
        return new UserProcessor();
    }
The above is a sample method of instantiating an ItemProcessor.
ItemWriter
This is similar in functionality to an ItemReader but with inverse operations. In both ItemReader and ItemWriter, Resources still need to be located, opened, and closed but, an ItemWriter writes out, rather than reading in. In the case of databases or queues, these operations may be inserts, updates, or sends. The format of the serialization of the output is specific to each batch job.
Like it’s ItemReader counterpart, ItemWriter is a fairly generic interface, as shown below:
public interface ItemWriter<T> {

    void write(List<? extends T> items) throws Exception;

}
Step
A Step in Spring Batch refers to a domain object that encapsulates an independent, sequential phase of a batch job and contains all of the information necessary to define and control the actual batch processing. The contents of any given Step are at the discretion of the developer writing a Job. A Step can be as simple or complex as the developer desires. A simple Step might load data from a file into the database, requiring little or no code (depending upon the implementations used). A more complex Step might have complicated business rules that are applied as part of the processing. In this tutorial, we are going to keep it as simple as possible.
Job
A Job - stereotypically relates to the concept of a batch job - is an entity that encapsulates an entire batch process. As is common with other Spring projects, a Job is wired together with either an XML configuration file or Java-based configuration. This configuration may be referred to as the "job configuration". However, Job is just the top of an overall hierarchy.
In this tutorial, we will demonstrate how ItemReader, ItemWriter, ItemProcessor, Step and Job work together to help transform an unprocessed CSV file into a processed CSV file.
Operations
- Read a user information from a CSV file
- Call an endpoint called http://jsonplaceholder.typicode.com/users
- Compare the CSV file content with the response from the API call.
- Then, we would write the response into another CSV file.
Processing CSV files
Spring has made it easy for individuals to spin off spring applications with spring initializr. All you need to do is go start.spring.io and create your initial application. The image below shows how the project was created.
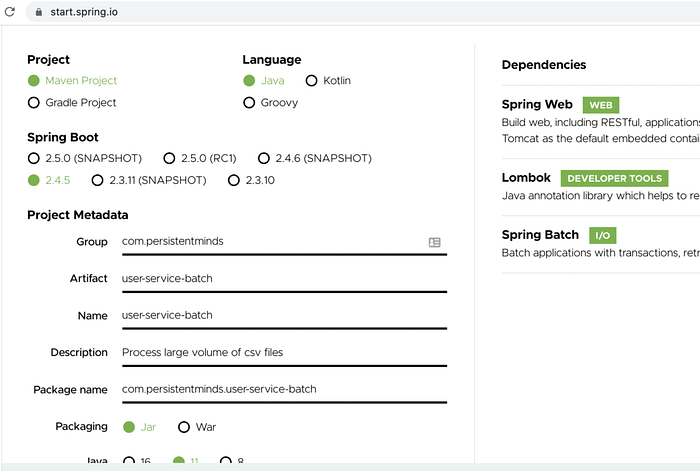
In the project section, select what you want to use. For the purpose of this tutorial, we will select Maven, Java as language, Spring Boot 2.4.5 version.
<?xml version="1.0" encoding="UTF-8"?>
<project xmlns="http://maven.apache.org/POM/4.0.0" xmlns:xsi="http://www.w3.org/2001/XMLSchema-instance"
         xsi:schemaLocation="http://maven.apache.org/POM/4.0.0 https://maven.apache.org/xsd/maven-4.0.0.xsd">
    <modelVersion>4.0.0</modelVersion>
    <parent>
        <groupId>org.springframework.boot</groupId>
        <artifactId>spring-boot-starter-parent</artifactId>
        <version>2.4.4</version>
        <relativePath/> <!-- lookup parent from repository -->
    </parent>
    <groupId>com.persistentminds</groupId>
    <artifactId>user-service-batch</artifactId>
    <version>0.0.1-SNAPSHOT</version>
    <name>user-service-batch</name>
    <description>Process large volume of csv files</description>
    <properties>
        <java.version>11</java.version>
    </properties>
    <dependencies>
        <dependency>
            <groupId>org.springframework.boot</groupId>
            <artifactId>spring-boot-starter-web</artifactId>
        </dependency>
        <dependency>
            <groupId>org.springframework.boot</groupId>
            <artifactId>spring-boot-starter-batch</artifactId>
        </dependency>
        <dependency>
            <groupId>org.springframework.batch</groupId>
            <artifactId>spring-batch-test</artifactId>
        </dependency>
        <dependency>
            <groupId>org.springframework.boot</groupId>
            <artifactId>spring-boot-starter-test</artifactId>
            <scope>test</scope>
        </dependency>
        <dependency>
            <groupId>org.projectlombok</groupId>
            <artifactId>lombok</artifactId>
            <optional>true</optional>
        </dependency>
        <dependency>
            <groupId>org.springframework</groupId>
            <artifactId>spring-web</artifactId>
            <version>5.3.5</version>
        </dependency>
    </dependencies>
    <build>
        <plugins>
            <plugin>
                <groupId>org.springframework.boot</groupId>
                <artifactId>spring-boot-maven-plugin</artifactId>
            </plugin>
        </plugins>
    </build>
</project>
The pom.xml file looks like the above.
Next, we would create model. We have 3 models, one to read User information from the CSV called ReadUser, one to read user information from the API http://jsonplaceholder.typicode.com/users with the help of RestTemplate provided to us by Spring Starter Web defined in our pom.xml file called User and one to write the processed data into another CSV file called WriteUser.
Jsonplaceholder.typicode.com has list of sample data that you could call whenever you need to call an API to help you demonstrate API calls with any programming language. we using /users in this tutorial.
Next, we will create a processor class that helps us process the read data and write it into another CSV file.
@Override
    public WriteUser process(ReadUser readUser) throws Exception {
        WriteUser writeUser = new WriteUser();
        apiUserResponse = restTemplate.getForEntity(restUrl, User[].class);
        results = Arrays.asList(apiUserResponse.getBody());
        results.forEach((result) -> {
            if (readUser.getId().equals(String.valueOf(result.getId()))) {
                writeUser.setId(readUser.getId());
                writeUser.setName(result.getName());
                writeUser.setPhone(result.getPhone());
                writeUser.setWebsite(result.getWebsite());
                writeUser.setUsername(result.getUsername());
            }
        });
        return writeUser;
    }
The code snippet above is the processor that helps us process our data. An API call is made to http://jsonplaceholder.typicode.com/users with the help of RestTemplate. The result of that response is checked against data that have been read from our input.csv to see if there is a match. Once there is a match, we are writing Id, Name, Phone number, website as well as the Username of the user into WriteUser class. This is eventually sent to ItemWriter to be written into another CSV file.
Next, we will create a config class with @Configuration and @EnableBatchProcessing annotations to tell the class that it’s a config class and also to enable batch processing respectively. In this class, we will define a method that reads our CSV file FlatFileItemReader, FlatFileItemWriter, Step, Job and instantiate the ItemProcessor
As you could observe in the code snippet above, FlatFileItemReader class is instantiated in line 3. In line 4, setLinesToSkip(1) help to skip the first line which consist of the title of the CSV file and read the rest of the lines.
In Line 5, we are reading the CSV file — which is in resources/input.csv directory of the project by either reading the file during deployment or use the path in the application.properties file in the resources folder to get this file.
@Bean
public FlatFileItemWriter<WriteUser> csvUserWriter() {
        FlatFileItemWriter<WriteUser> userWriter = new FlatFileItemWriter<>();
        String exportFileHeader = "Id,Name,Phone,Website,Username";
        StringHeaderWriter headerWriter = new StringHeaderWriter(exportFileHeader);
        userWriter.setHeaderCallback(headerWriter);
        userWriter.setResource(new FileSystemResource(getInputOutputFiles()[1]));
        userWriter.setLineAggregator(new DelimitedLineAggregator<>() {
            {
                setDelimiter(",");
                setFieldExtractor(new BeanWrapperFieldExtractor<>() {
                    {
                     setNames(new String[]    {"id","name","phone","website","username"});
                    }
                });
            }
        });
        return userWriter;
    }
Next, is to define the writer with the use of FlatFileItemWriter. This class helps us to write our processed information into a file. getInputOutputFiles() is a java method that helps us return the name of the destination file and where it will be located.
@Bean
public Step csvFileToCSVStep() {
        return stepBuilderFactory.get("csvFileToCSVStep")
                .<ReadUser, WriteUser>chunk(1)
                .reader(csvUserReader())
                .processor(csvUserProcessor())
                .writer(csvUserWriter())
                .build();
    }
As expected, every spring batch application is expected to have steps and Jobs. The line 3 above specifies the name of the step. Line 4 specifies the number of chunks. Line 5 reads the CSV file, line 6 processes the file, line 7 writes the processed data into another CSV file while line 8 is essential to the success of the method.
@Bean
 public Job csvFileToCSVJob() {
        return jobBuilderFactory
                .get("csvFileToCSVJob")
                .incrementer(new RunIdIncrementer())
                .start(csvFileToCSVStep())
                .build();
    }
The job method is essential to running all the steps that might have been defined in the step. This helps to encapsulate the entire batch process.
The rest of the code could be found in the Github.
Deployment
In order to deploy this application, all you need to do is:
- Clone the Github repository
- Run mvn clean install
- Run mvn spring-boot:run Or Run java -jar </path/to/the/application>/target/user-service-batch-0.0.1-SNAPSHOT.jar input.csv <output.csv>
Where </path/to/the/application> is the path to the cloned repository. input.csv the name of the csv file found in the Resources folder of the application, and <output.csv> is the name you intend to give the output CSV file, which could be output.csv or any other name you desire.
Happy coding!